


Cress is just great if you want to do something with the children where they can see the fruits of their labour early on. I would most likely go so far to say that it is one of the easiest things to grow and what’s more, you can grow this indoors – perfect for getting those green fingers ready for the spring. And it goes lovely in those egg sandwiches that you can have ALL year round!
Because cress is just so simple to grow, you can use it as a good experiment with the children to show them all the things that plants need to grow. OK – we will be using cotton wool for this one and not nutritious soil that we use for other herbs and vegetables. But cress still needs water, sunlight and warmth to grow.
How long will it take? About 10 days and it will be ready to eat
What can you do with it? Eat it! And have some fun cutting the hair of course!
Difficulty Rating: Easy
How to do it
Let’s start by saying that it is not rocket science! But you are going to need some key things to get started:
What you will need
Eggs – yes, you can eat them first – just be careful how you crack them. Past experience shows that boiled eggs are best
Cotton Wool – A staple in every family home
Cress Seeds – Bought from any garden centre. We use these ones from Amazon

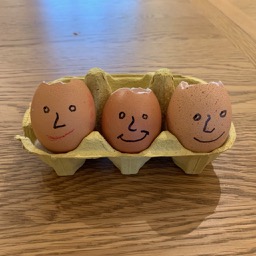
Coloured pens – Some coloured pens to decorate the eggs. You can also use other craft if you want to get creative!
Something to stand them in – Egg boxes are find for this but you can also make a little person if you are an arty type.
Preparing the eggs
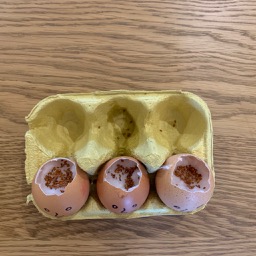
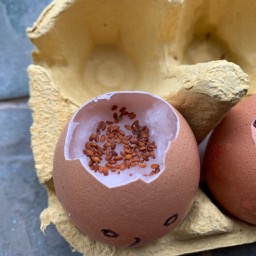
There is one of two things that you can do here. You can either boil the eggs and eat them – saves on wastage. Or, you can literally put some very small holes in the eggs and drain out all of the insides. Either way, you need to be careful not to crack too much off the top of the egg. About that of the picture below.
Once you have the egg shell with nothing in it, wash them out so that there are no ‘bits’ left that will begin to smell a few days down the line. Warm water is fine.

Decorate the eggs
Decorate the eggs. It is best to do this now so that you don’t end up spilling the seeds when you pick them up later.
Filing the eggs
Now that the eggs are clean, you can start putting the filling in them. We’re going with cotton wool on this one but you can use compost if you wish – it is just a little messier. Put enough cotton will in so that it comes up to about 1cm below the top of the egg

Add the seeds
No sprinkle some seeds on the top of the cotton wool and mist spray with some water. If you don’t have a mister, we found the next best thing to use is a Call syringe (most homes have a few of these lying around).
Now wait
It will only take a few days for you to see the results. These seeds germinate pretty quickly.

Whilst the seeds are growing, don’t forget to water them. They don’t need much, only a small amount every couple of days. If you have them in full sun on the windowsill, you might want to water them with only a little every day. If you have a spray gun, this will be fine. However, we actually use the Calpol syringe as we can get to the area where the roots are. This way is also great for little fingers as they can use them pretty easily.
After only 10 days, we have our Cress Heads!!


Time to give them a quick haircut and enjoy some lovely egg and cress sandwiches! For the next round, I think I am going to need to get more creative!!
So there is cress! An easy to grow plant, it tastes delicious in an sandwich with eggs and you can grow it all year round!


